

Think of your Facebook Business Page as the base camp for your brand’s presence on the world’s largest social media platform.
This important feature has undergone countless changes and updates since Facebook first rolled it out in 2009, but it remains as crucial as ever. If you’re going to succeed on Facebook, your Business Page must align with your business values, goals, and broader marketing strategy.
Whether starting from scratch or looking to update an existing Business Page, read on for our top 10 steps to optimize yours!
1. Complete All the Sections of Your Facebook Business Page
Facebook Business Pages contain many different sections. Those sections are there for a reason, so filling them all in is in your best interests. The more information you provide, the better people will understand your business and the more likely you will appear in Facebook search results.
Start With the Basics
For starters, Facebook asks for the following details:
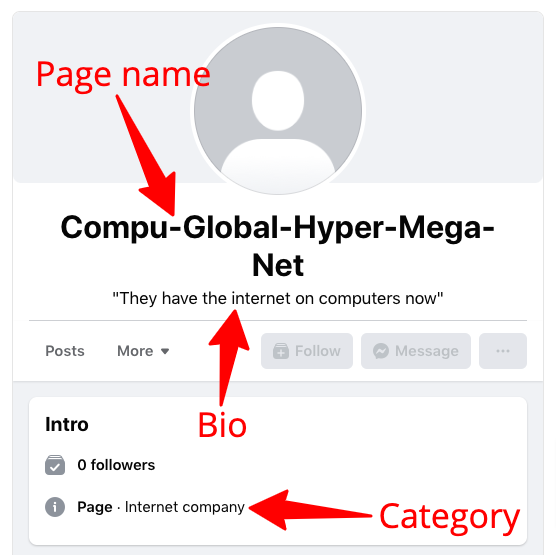
- Page name: This will likely be your company’s name.
- Bio: Use this optional section to briefly explain your business, up to a limit of 255 characters.
- Category: Select up to three categories that describe what your business does. Try to be as specific as possible (e.g. if you fix laptops, choose “computer repair service” rather than “local business”).
2. Add Information To Help People Connect With You
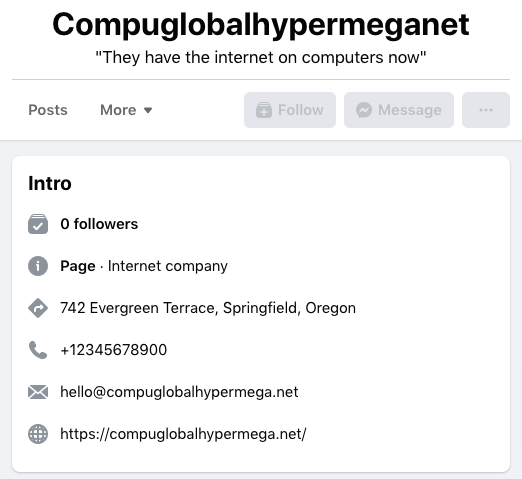
Next, it’s time to fill out some basic details to help potential customers contact or buy from your business.
Specifically, you can add your:
- Website address
- Phone number
- Email address
- Street address
- Opening hours
All these details will appear in the Intro section of your Business Page:
3. Add a Profile Picture, Cover Photo & CTA Button
Next, add some visual appeal to your Business Page by adding a profile picture—most likely your brand logo—and a cover photo that speaks to your products or services. (For more guidance on choosing appropriate imagery, check out the section on building a mobile-friendly page and read our article, 10 Tips For Creating Branded Social Graphics.)
At this point, you can also add an “Action Button” to your page. This is a call to action (CTA) that prompts page visitors to do something, such as:
- Clicking through to your website
- Completing a signup form
- Sending you a message through WhatsApp, Facebook Messenger, or email
- Watching an explainer video
- Placing a reservation
To do it, just click Add Action Button in the left-hand menu.

Then, choose the most relevant option and complete the onscreen options to drive your desired action.
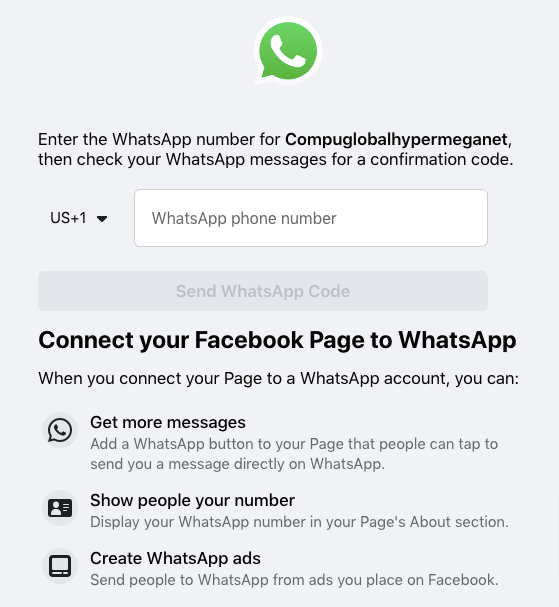
Finally, you can connect your Business Page to WhatsApp so people can contact you via the messaging platform without leaving the comfort of Facebook. It’s simple: just enter your WhatsApp number and follow the prompts.
4. Introduce Your Page To the World
Now that you’ve filled out all the critical information, it’s time for your shiny new page to go public. Give it a shot in the arm by inviting friends on your personal profile to follow your Business Page.
To do it, just click the button marked Invite Friends to switch to your personal profile.
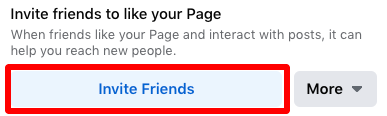
Then, scroll through your list of friends to invite all those who might be interested (or just click Select All to invite everyone).
Finally, write a welcome post introducing people to your Business Page. Try to highlight your value proposition and, if relevant, explain the topics you’ll post about. You can also add photos or videos to grab people’s attention.
5. Ensure Your Page Is Mobile-Friendly
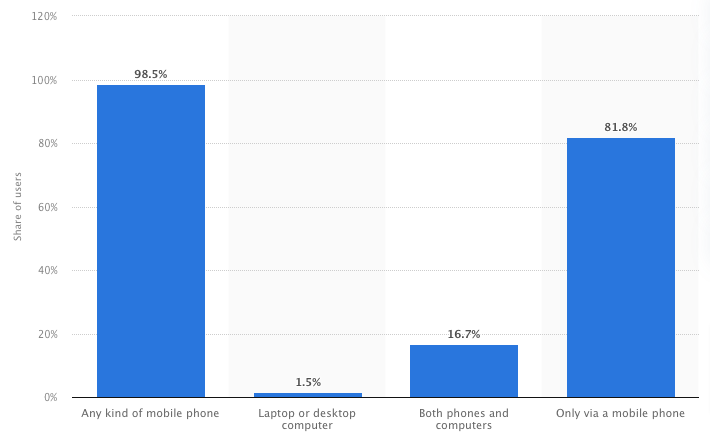
Did you know that a whopping 98.5% of Facebook users sometimes visit the platform on mobile devices, while 81.8% only check Facebook on mobile?
That means it’s essential your Facebook Business Page plays nice on mobile devices.
Here are a couple of tips to make that happen:
6. Create a “Mobile-Safe” Cover Image
Your cover image is the photo or graphic at the top of your Facebook Business Page, meaning it’ll be the first thing many people see when visiting your profile.
Chances are you’ll design your cover image on a desktop. Still, it’s important to remember that Facebook’s cover photo dimensions vary by device type. This can cause some real headaches when creating a cover image that looks good on every device.
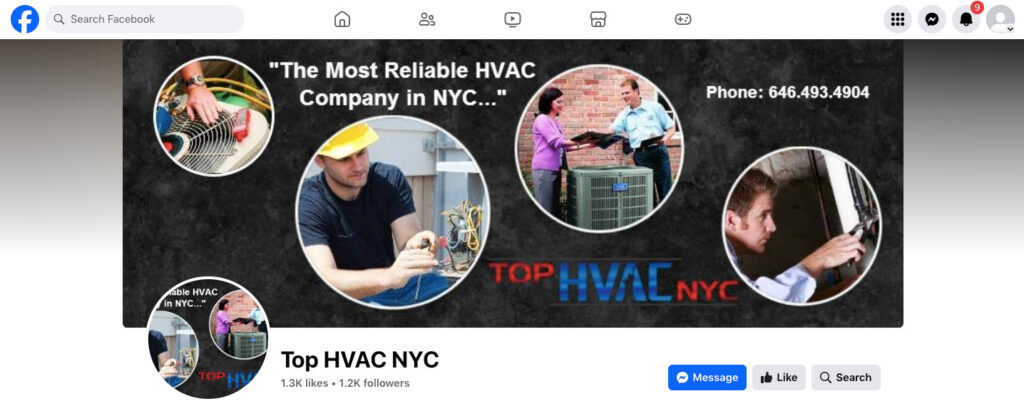
To illustrate the problem, let’s look at the Business Page for Top HVAC NYC. Here’s how their cover image looks on a desktop.
Now, here’s the same image displayed on an iPhone 12 Pro:
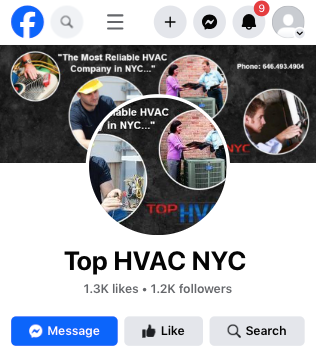
Not so good, huh? The profile picture takes up a big chunk of the cover image, obscuring the business name and removing much of the visual detail. Plus, the phone number is hard to read.
Facebook uses the following dimensions for cover images:
- Desktop: 851 x 315 pixels
- Mobile: 640 x 360 pixels
In other words, your cover image will look taller and narrower on mobile, and your profile picture will block much of it. So your most important information — like your business name and most eye-catching imagery — should be toward the upper middle of your cover image.
7. Optimize Your Profile Picture for Mobile
Even more important than your cover image is your profile picture, which appears at the top of your Business Page and in every post you share.
As our friends at Top HVAC NYC demonstrated, Facebook has different dimensions for profile pictures on desktop and mobile. Specifically, it uses the following dimensions:
- Desktop: 170 x 170 pixels
- Mobile: 128 x 128 pixels
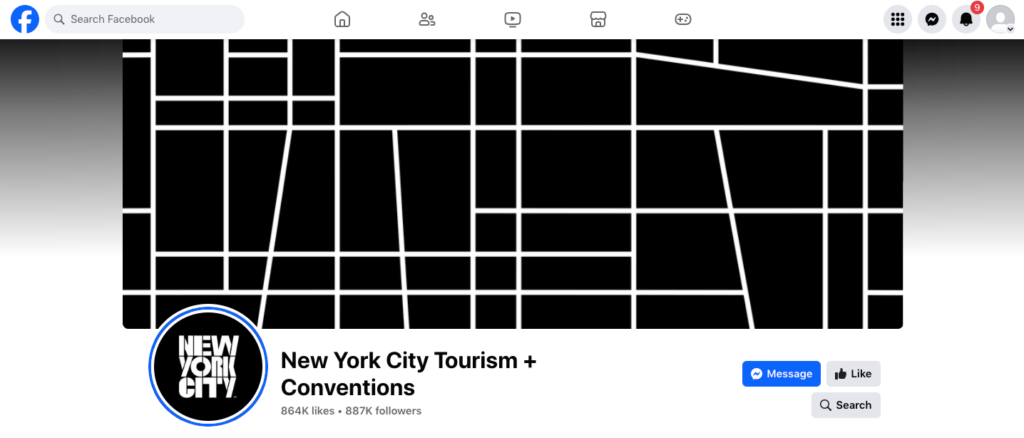
So, your profile picture will be smaller on mobile, but it’ll take up more of the screen proportionally. It needs to complement your cover image and be legible at 128 x 128 pixels, so your best bet is to keep it simple — just like New York City Tourism + Conventions.
Here’s how their profile image looks on desktop.
Here’s the mobile version, again viewed on an iPhone 12 Pro:
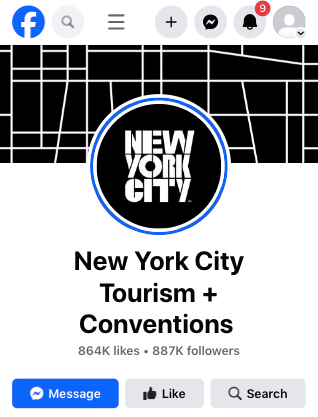
Both stand out beautifully and are legible, so if you’re searching for their Facebook Business Page, it’s immediately apparent you’re in the right place.
8. Set Up Automated Page Moderation
While we like to see the best in people, it’s worth remembering that plenty of trolls exist.
You don’t want their comments plastered all over your Business Page. But equally, there are only so many hours in the day, and you (probably) don’t want to spend them removing malicious replies.
Fortunately, Facebook has a simple solution: a Moderation Assistant. This assistant allows you to set criteria to automatically hide certain comments. To turn it on, click Moderation Assist in your Business Page’s Professional Dashboard, then add your desired criteria.
As standard, the Moderation Assistant will hide comments from authors without friends or followers.
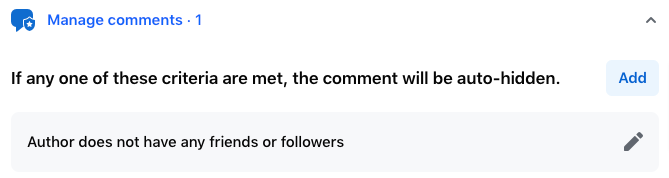
However, you can choose from a bunch of other options, such as auto-hiding comments:
- Containing links
- Written by authors who’ve had 3+ comments reported, hidden, or blocked by admins in the previous 30 days
- From authors who don’t have a profile picture
Once you’ve set up all your desired controls, you can spend less time moderating comments and more time creating quality content!
👉 Learn more: 10 Tips for Navigating Negativity on Social Media
9. Add Links To Your Other Social Channels
Chances are, Facebook isn’t the only social network you use.
And we’re also guessing you’d like people who follow your Facebook Business Page to check you out on other platforms. Because the more places they see your content, the more likely they are to remember you (and, hopefully, buy from you).
Facebook lets you add links to 24 social platforms, including Instagram, X/Twitter, Snapchat, and TikTok.
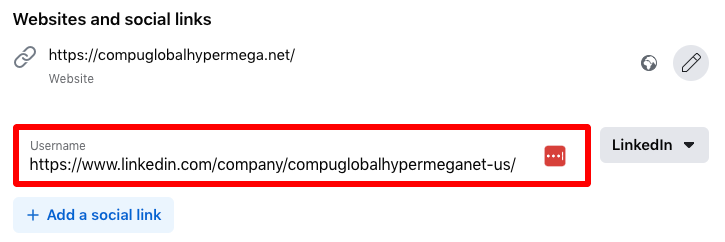
To do it, visit your Business Page, click the Edit button, scroll down to the Websites and social links section, choose your desired social channel from the drop-down menu, and paste your username or URL:
10. Run a Video A/B Test
One of the newest and most exciting features for Facebook Business Pages is the ability to A/B test video content free of charge, which can help you better understand what works best with your audience.
To set up your first video A/B test, click A/B test in your Professional Dashboard menu, then upload the content you want to test. You can either test two different videos or the same video while varying other elements (like the thumbnail or title). For best results, only test one variable at a time.
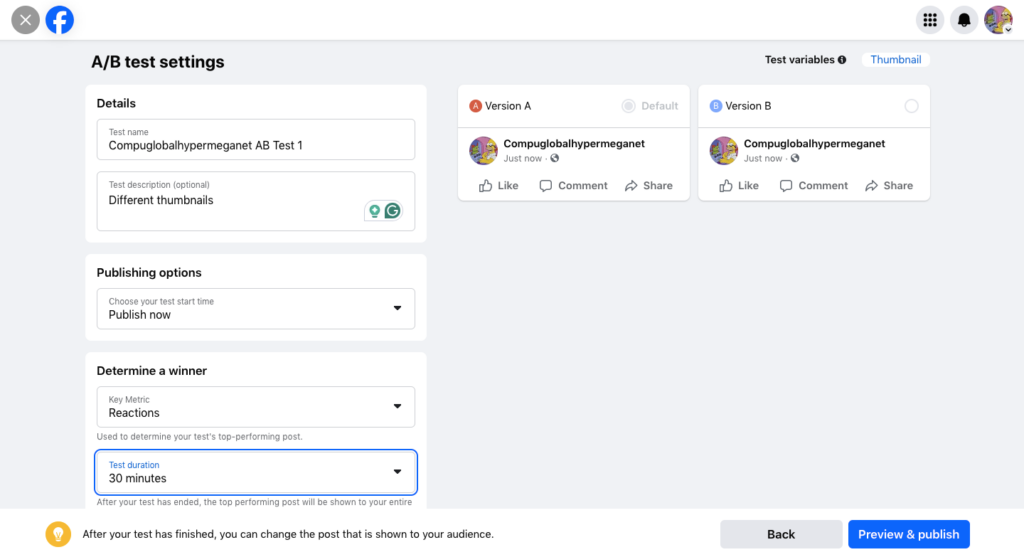
Give your AB test a name (and, optionally, a description so you can remember what you were testing), then tell Facebook which metric you’re optimizing for from the following list:
- Comments
- Shares
- Link clicks
- 1-minute video views
- Reactions
- People reached
- Average time watched
You can also set the duration of your A/B test up to a maximum of 24 hours. Check back at the end to see which video won!
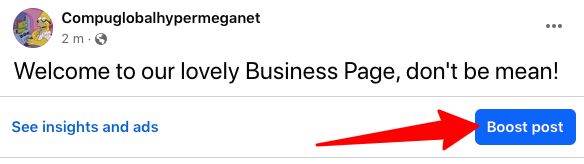
11. Boost Your First Post
Inviting friends and relying on Facebook users to stumble upon your Business Page will only get you so far. At some point, if you want to speed up your page growth, you’re going to have to invest some ad dollars.
The best way to get started is to “boost” a post already generating a decent volume of engagements. To do it, find the post in question, then click Boost post:
You’ll be transported to Facebook’s ad center, where you can choose:
- Which audiences you want to target
- Your daily ad budget
- Where you want your ad to appear
- Whether you want to track what happens when people click through from the ad to your website by setting up the Meta pixel
- How you want to pay for your ad campaign
When you’re satisfied with the results, click Publish to boost your post and check your analytics to see how many impressions and engagements you generate.
👉 Learn more: 16 Stellar Examples of High-Converting Facebook Ads
Want to discover how successful marketers use Facebook to grow their audience and achieve their business goals? Sign up for one of our upcoming social media conferences.
Featured image by Pexels.


